Introduction
In this guide, one will learn how to rebuild a water‑softener resin tank, replace the exhausted resin, and restore the quality of household water. The process saves the expense of purchasing an entirely new softener while extending the service life of existing equipment. By following each step, a homeowner can achieve performance comparable to a brand‑new unit without professional assistance. The information presented is based on industry best practices and real‑world experiences shared by users of the products listed below.
What You’ll Need
- Adjustable wrenches or pipe pliers
- Large bucket or container for draining water
- Funnel for pouring resin (optional but recommended)
- Protective gloves and safety glasses
- Cleaning brush or sponge
- New ion‑exchange resin (choose one of the products listed in the "Products Mentioned" section)
- Plumber’s grease for O‑rings (if required)
Step 1 – Shut Off Water and Power
The first action is to turn off the main water supply to the softener and disconnect the electrical power source. Locate the isolation valve on the inlet line and rotate it clockwise until it stops. Then, unplug the unit or switch off the breaker that supplies electricity to the control head. This precaution prevents accidental leaks and eliminates the risk of electric shock while the tank is opened.
After the water is shut off, open a faucet downstream of the softener to relieve residual pressure. Allow the water to run until the flow ceases, indicating that the system is fully depressurized.
Step 2 – Bypass the Softener
Most residential softeners are equipped with a bypass valve that redirects water around the resin tank. Set the valve to the “bypass” position so that water can flow directly to the house while the tank is serviced. This step ensures that other fixtures remain operational and that the tank can be emptied without contaminating the household supply.
Verify the bypass status by checking that water emerges from a downstream faucet without passing through the softener. If the valve is missing or malfunctioning, one may temporarily disconnect the inlet and outlet hoses and attach a short piece of pipe to maintain flow.
Step 3 – Drain and Remove the Old Resin
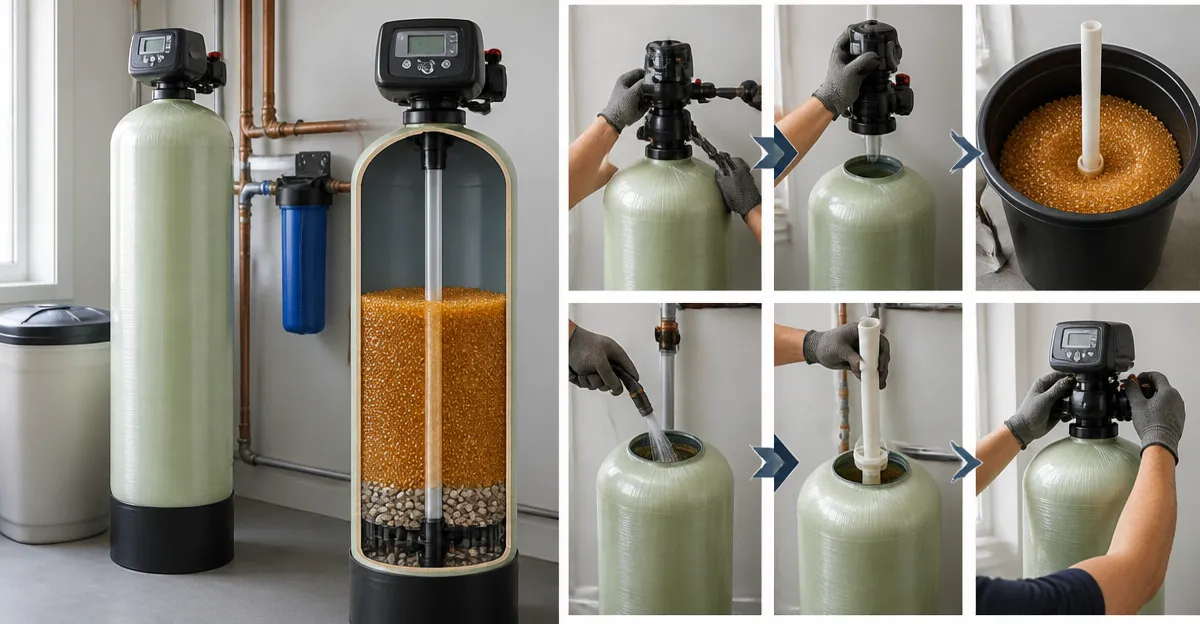
Place a large bucket beneath the drain valve located at the bottom of the resin tank. Open the valve and allow the remaining water to empty completely. Once the tank is dry, remove the top cover by loosening the retaining bolts with an adjustable wrench.
With the cover removed, the old resin will be visible as a mass of beads. Using a sturdy scoop or a clean bucket, carefully extract the resin and transfer it to a waste container. It is advisable to wear gloves, as the beads can become abrasive when they dry.
During extraction, inspect the tank interior for broken beads, debris, or mineral buildup. Any foreign material should be removed before installing the new resin.
Step 4 – Clean the Tank Interior
A clean tank is essential for optimal resin performance. Use a soft brush or sponge with a mild detergent solution to scrub the interior walls, focusing on the inlet and outlet ports. Rinse thoroughly with clean water to eliminate any soap residue.
If the tank shows signs of scaling, a solution of white vinegar and water (1:1 ratio) can be applied for several minutes before rinsing. Allow the tank to dry completely before proceeding to the next step.
Inspect the O‑rings and seals for cracks or wear. Replace any damaged components with new plumber’s grease‑lubricated O‑rings to ensure a leak‑free reassembly.
Step 5 – Install New Resin
The selection of appropriate resin is critical for achieving the desired water‑softening capacity. The following products are highly rated and suitable for most residential systems:
- Superior Filters Water Softener Resin – 1 cu ft, 32 000‑grain capacity, 7 % cross‑linked polymer, priced at $100.00 with a 4.6‑star rating from 54 reviews. Its high‑performance resin offers rapid ion exchange and extended lifespan, making it an excellent primary choice.
- DuraWater Purolite C‑100E Resin – 1 cu ft bag, priced at $190.00 with a 4.6‑star rating from 1,077 reviews. This resin provides efficient regeneration and low extractables, suitable for users who prioritize kinetic performance.
- iFilters Softener Resin – ½ cu ft (two 12.5‑lb bags), 16 000‑grain capacity, priced at $74.99 with a 4.4‑star rating from 719 reviews. Its universal compatibility and easy‑pour design make it ideal for smaller systems or partial replacements.
- AFWFilters Purolite C100E Resin – 1 cu ft bag, priced at $180.19 with a 4.7‑star rating from 92 reviews. The package includes a hardness test kit and written installation guide, which simplifies the regeneration process for first‑time users.
- ABCwaters Softener Resin – 1 cu ft bag, priced at $169.00 with a 4.6‑star rating from 396 reviews. This high‑capacity resin is compatible with both residential and industrial units and offers additional removal of iron, manganese, and suspended matter.
For most homeowners, the Superior Filters Water Softener Resin provides the best balance of capacity, price, and durability. To load the resin, position a funnel over the tank opening and slowly pour the beads until the tank is filled to the recommended level (typically 85‑90 % of the tank volume). Avoid overfilling, as excess resin can impede water flow.
After the resin is in place, gently tap the tank sides to settle the beads and eliminate air pockets. This step improves the uniformity of ion exchange during the first regeneration cycle.
Step 6 – Reassemble the Unit and Restore Power
Replace the tank cover and tighten the retaining bolts evenly to prevent warping. Reinstall any O‑rings with a thin coat of plumber’s grease to ensure a proper seal.
Return the bypass valve to the “service” position, allowing water to flow through the resin tank again. Open the main water supply valve slowly, checking for leaks at all connections. Once the system is pressurized, restore electrical power by plugging the unit back in or flipping the breaker to the “on” position.
Initiate a manual regeneration cycle according to the manufacturer’s instructions. This process flushes any residual air and primes the new resin for optimal performance.
Step 7 – Verify Soft Water Quality
After regeneration, test the water hardness using a calibrated test kit or a digital hardness meter. The target hardness should be below 3 grains per gallon (gpg) for most household applications.
If the hardness exceeds the desired level, verify that the resin was filled to the correct capacity and that the bypass valve is correctly positioned. Additional regeneration cycles may be required to achieve the final softness.
Document the installation date and the resin brand for future reference. Regular maintenance, such as checking salt levels and cleaning the brine tank, will prolong the life of the new resin.
Tips & Pro Tips
- Always wear protective gloves and eyewear when handling resin beads, as they can become sharp when dry.
- Use a funnel with a wide mouth to minimize spillage and reduce cleanup time.
- Record the hardness level before removal of the old resin; this baseline helps evaluate the effectiveness of the new resin.
- Consider adding a small amount of water‑softener conditioner to the brine tank to improve regeneration efficiency.
- Schedule a resin replacement every 8‑10 years for municipal water supplies, or every 5‑6 years for water with high chlorine content.
Troubleshooting
| Problem | Possible Cause | Solution |
|---|---|---|
| Reduced water flow after installation | Overfilled resin or blocked inlet | Turn off water, remove excess resin, and clean inlet screen. |
| Soft water taste is salty | Insufficient rinsing of new resin | Run a full regeneration cycle and flush the system for an additional 24 hours. |
| Hardness does not drop after regeneration | Resin not compatible with system capacity | Verify resin grain capacity matches tank size; consider using a higher‑capacity product such as Superior Filters or ABCwaters resin. |
Conclusion
By following the steps outlined in this guide, one can successfully rebuild a water‑softener resin tank, replace exhausted beads, and restore the softness of household water. The process eliminates the need for costly equipment replacement and empowers homeowners to maintain their water‑treatment systems with confidence. Selecting a high‑quality resin—such as the Superior Filters Water Softener Resin—ensures long‑term performance and protects appliances from scale buildup.
Regular monitoring and timely regeneration will keep the system operating at peak efficiency for years to come. One is now equipped with the knowledge to undertake this DIY project safely and effectively.
Products Mentioned in This Guide
Frequently Asked Questions
How do I know when the resin in my water softener needs to be replaced?
If water hardness returns, you notice reduced softening efficiency, or the resin is more than 5‑7 years old, it’s time to replace it.
What tools are essential for rebuilding a water‑softener resin tank?
Adjustable wrenches or pipe pliers, a bucket, protective gloves, safety glasses, a cleaning brush, and plumber’s grease for O‑rings are the basics.
Can I rebuild the resin tank myself without professional help?
Yes, with the proper tools and step‑by‑step guidance you can replace the resin and restore performance on your own.
How should I prepare the new ion‑exchange resin before adding it to the tank?
Rinse the resin in a bucket of water to remove dust, then use a funnel to pour it gently into the tank to avoid spills.
What safety precautions are needed while rebuilding the resin tank?
Turn off water and power, wear gloves and safety glasses, and ensure the area is well‑ventilated to prevent injury or exposure to debris.